New leads come from your agent website, company website, social media, etc. Learn how to accept company leads by phone and route your personal leads through third-party sources.
Accept new Company Leads
When your company routes you a new lead, you will receive a phone call from (970) 660-5323.
Follow the call’s instructions to accept the lead:
- Press 1 to indicate you’ve answered the call.
- You will hear some basic details about the lead. Press 1 again to accept the lead.
If you miss the call and your company uses claim times, you’ll have a chance to receive the lead by text, email, or voicemail.
- Text: You’ll receive a text from 66914. Reply YES to accept. Note: Opt in to lead acceptance text messaging from your Lead and Notification Settings.
- Email: You’ll receive an email from Zap@leadrouter.com. Reply to accept.
- Voicemail: You’ll receive a voicemail from (970) 660-5323. Return this call. When prompted, press 1 to accept the lead.
If you aren’t receiving new leads, you may need to edit your contact information or hours of availability. For more information, see Lead and Notification Settings.
Funnel Leads into Zap from Zillow, Trulia and Realtor.com
Funnel your third-party leads from Zillow, Trulia, Realtor.com, etc. directly into Zap.
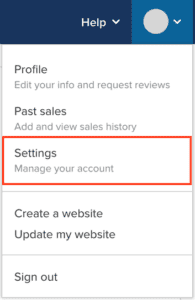
1. Click your name from the top navigation. Then, select Lead and Notification Settings from the dropdown.
2. Locate Routing Email from the section, Contact Information. Your Routing email address will look something like this: 123456.lead.123456788@leads.leadrouter.com.
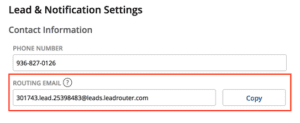
3. Click copy to save your routing email to your clipboard.
Once you have your Routing email address, add it to any of your lead generation accounts (Zillow, Trulia, Realtor.com, e.g.). Note: Leads that flow into Zap from these lead sources will be tagged as Agent Leads.
Follow these steps to route your leads from Zillow to Zap:
1. Go to www.zillow.com and sign in to your account. Then, click Agent Hub in the top right navigation.
2. Click your profile photo on the top right corner.
3. Select Account Settings from the dropdown menu.
4. From the left-hand navigation, locate the section Inbox and select Lead Forwarding.
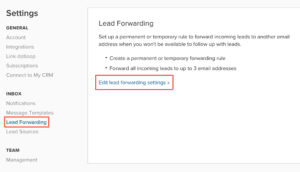
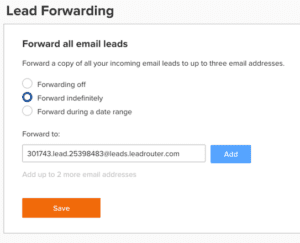
5. Click Edit lead forward settings.
6. Locate the filed labeled Forward to and paste your routing email. Then, click Add.